Sunday, October 8, 2017

An Update from Herrington Harbour North

Rosalind on the Hard
Herrington Harbour North Marina

Rosalind is still on the hard for a few more weeks. While the rudder is drying out and before we have her bottom painted, we are wrapping up some last minute projects.

We just finished refurbishing the propane system. We now have a new low pressure hose the goes through five bulkhead penetrations (to prevent chafing) and connects the galley stove to the regulator under the port stern seat. We made new teak brackets to hold the regulator as the galvanized ones were rusting away. We also got a new high pressure hose from the regulator to the propane bottle. It was a real adventure to get the high pressure hose. Cheryl had to go to many stores to find the right length and the right end fittings. As part of the refurbishment, we installed a new propane shutoff solenoid valve and wired it so that the propane can be easily shut off from the galley by a switch. Lastly, we successfully leak-tested the refurbished propane system.

Propane Solenoid Switch (bottom)

In another project, Cheryl sanded and coated the aft companionway teak rails with Cetol protective wood finish, as the rails were in real need of some TLC. She also primed and painted the diesel fuel deck standpipes with Brightside paint.

Aft Cabin Companionway Rail (Before)

Aft Cabin Companionway Rail (After)

We installed a flapper on the engine exhaust. This will prevent any following seas from entering the engine block through the stern exhaust when the engine is not running.

Exhaust Flapper

Exhaust Flapper

We also installed the hailer horn/speaker for the VHF radio on the mizzen mast; however, the wiring from the aft cabin to the radio in the main salon still needs to be strung through the engine room.

Hailer Installed on Mizzen Mast (above Anemometer)

We installed padeyes with backing plates in three locations. We have one in the cockpit to secure our tethers, which are attached to the safety harness on our life jackets. The cockpit padeye can be reached from both the main and aft cabins so we can get clipped in before getting into the cockpit. We installed two more padeyes, one on each side of the aft cabin, to secure the aft ends of the jacklines, which are lengths of webbing running bow to stern onto which we clip our tethers if we need to leave the cockpit during night watches, heavy weather, or passages. We used varnished teak pads, stainless steel backing plates, and acorn nuts to cap the protruding machine screws inside the aft cabin. The padeyes are installed far enough forward so that we cannot fall off the stern yet we can still work the mizzen.

Padeye in Cockpit - Starboard Side

Varnished Teak and Stainless Steel Backing Plates for Starboard Padeye (on left) - Aft Cabin 

Varnished Teak and Stainless Steel Backing Plates for Port Padeye (on right)
 Telltale Compass (on left) - Aft Cabin 

Starboard Padeye (forward of portlight) - Aft Cabin 

Over the next two weeks we plan on finishing the rudder work, painting the prop, doing some canvaswork and getting Rosalind ready to launch. We want to thank you for following us on our voyage.

Alex and Cheryl

Thursday, September 14, 2017

Rosalind's Cockpit

Here is a sketch and a video tour of Rosalind's cockpit.

Rosalind's Cockpit


Here is some more information on the instruments described in the video.
  • Remote VHF radio microphone.  This communications instrument allows us to monitor and operate the VHF radio from the cockpit while having the VHF radio unit permanently mounted in the main cabin.  The VHF radio is used to communicate with other vessels, drawbridge operators, marinas, the Coast Guard, etc.; to obtain weather information; and to receive Coast Guard broadcast messages. The VHF is connected to an antenna at the top of the main mast and has a range of about 10 nautical miles (20 kilometers).
  • AIS, Automatic Identification System, is a digital VHF radio-based transponder system that uses Global Positioning System (GPS) and identifies a ship's name, course and speed, call sign, and other information.  The system calculates the closest point of approach (CPA) and time to CPA between Rosalind and surrounding commercial ships and pleasure vessels equipped with AIS transponders. These ships appear as triangles on our chartplotter and by selecting them on the touchscreen we can get all the specifics of each ship.  Additionally, we can set the AIS to automatically alarm if any CPA is within a set exclusion area.
  • Iridium Go! satellite communication device. This satellite communications instrument connects to our smartphone and tablet using Wi-fi. We intend to use it during offshore passages to obtain NOAA weather faxes by email and to communicate to shore by text message. The system operates 10 times slower than dial-up internet! Additionally, we can place and receive satellite telephone calls.    
  • Lawrence multi-touch display. This touchscreen navigation instrument has our RADAR control and display, AIS control and display, and chartplotter (electronic charting system and GPS) all available on one screen. The RADAR enables us to see ships and landmasses around us as well as approaching thunderstorms. 
  • Autopilot. This electric motor, belt-driven navigation instrument is connected to the wheel and the vessel's course is set and adjusted at the autopilot head. 
  • Depthsounder, fishfinder.  This navigation instrument tells us the water depth and bottom contour as well as the relative size, quantity, and depth of fish in the water under Rosalind.  


Tour of Rosalind's Cockpit Navigation and Communication Instruments

Wednesday, September 6, 2017

Rosalind's Potable Water System

While Rosalind is on the hard getting new bottom paint, we wanted to share with you some of the upgrades we did last year. When we got Rosalind, we knew that the water system would need to be overhauled.  We did not dare to taste the water; we just smelled it and saw what flowed out of the long-unused lines! So last year, as part of her overhaul, we set out to redo the entire water system.

The first step was to remove all the old water hoses and the leaky, old hot water heater. In order to remove the water hoses connected to the water tank, we had to remove the salon table and the floor underneath it.  When Rosalind was built, she was set up with one 100 gallon (375 liter) water tank. The tank started under the V-berth and was connected to the main tank under the main cabin sole with a small fiberglass pipe. Rosalind was built with the water tank as part of the hull with several access hatches.

Opening up the Main Water Tank

Once the old tubing and leaky hot water heater were disconnected and removed, we opened up the the main tank access ports in the V-berth and salon. It took many days of hard work to scrub the 100 gallon (375 liter) tank. There was a lot of debris at the bottom of the tank. We even found a penny in there and wonder how it ever got in there!

In cleaning the water tank, we found that some of the original paint has started to flake off the tank and after some research we identified the special epoxy paint for small water tanks. We learned that the smaller the tank, the more stringent the requirements for the epoxy paint. We had a gallon (4 liters) of paint shipped to us and it took the better part of two weeks of work to clean and paint the water tanks.

Debris from the Bottom of the Main Water Tank (See the penny?)

With the access hatches open, I took the opportunity to isolate the water tank under the V-berth from the water tank under the main cabin. There was no point in having all our eggs in just one basket. Now, we have an 80+ gallon (300+ liter) main tank and a 20 gallon (75 liter) reserve tank forward. The original tank had a deck fill at the bow that got water to the part of the tank under the V-berth. With the tank spit in two, I had to install a water fill for the main cabin tank and find a way to get the water out of the forward tank.

For the main tank, I modified the aft-most access hatch and installed a small standpipe with a "deck fill" on the aft settee. To fill the main tank, we now just lift the settee cushion and open the deck fill. The advantage of this system is that with the deck fill down below, it is unlikely that the water tank will get contaminated with saltwater from any seawater on deck. We made a nice graduated dipstick when we first filled the main tank. We now know at a glance how much water we have in our main tank down to the gallon. Our new system to gage the amount of water in the tank requires no electricity and has no wiring or display unit, and is pretty foolproof.

New "Deck Fill" and Standpipe for Main Water Tank (Aft Settee)

 Main Tank Water Fill Connection (far left) in Aft Settee (Cushion Removed)

New Water Hoses (Under Salon Table)

The forward water tank is now our spare water tank and a manual pump next to head sink ensures that we will be able to get the water out if it even if all the ship's electrics fail. We also have a piece of copper tubing and hose which we can connect to the manual pump and get water out of the main tank as well. This system is very nice not only as a backup to get water out of the main tank, but it also serves to get the last four gallons (15 liters) out of the main tank that the pressurized water electric pump is unable to pump out.

Manual Pump in Head (far right)

After installing all new hoses (all 130 ft or 40 m of them!), we replaced the hot water heater and installed a high purity potable water filter in the galley. During commissioning this spring, we also added a secondary coarser filter upstream of it, under the galley sink, to prevent the high purity water filter from clogging up.

New Hot Water Heater Installed in Aft Cabin Hanging Locker


Seagull IV High Purity Activated Charcoal Water Filter Faucet in Galley (far right)


Under Galley Sink, Seagull IV Filter Canister (in background) and Pre-filter (in foreground)

We are very pleased with the overhauled water system. The dipstick and two separate tanks give us peace of mind; and the pressurized filtered drinking water and hot water are definitely very pleasant luxuries on board.

We have had a number of requests, so here is another piece of artwork.

Colorful Fishing Boat
 Sifnos, Greece


Thank you for following,
Alex and Cheryl

Tuesday, August 22, 2017

Adventures on the Chesapeake - Part Two

Captain Mike approached Rosalind on the starboard side and put out the towboat's large fenders. He asked, "Are you guys safe?" We relayed that everything was fine. He said, "There is a boat that has gone ashore on the beach at Chesapeake Beach. Do you mind if I take care of her first?" We told him that we were fine and that we would be standing by. He thanked us and headed south. Within a few minutes, he was barely a speck on the horizon. Then, the speck started getting larger again. The towboat was back in less than 10 minutes. Someone else had been able to help that boat in distress on the beach.

Now at Rosalind, Captain Mike handed me a bridle attached to the 2 inch (50 mm) diameter hawser, which would be used to tow us.  I ran the bridle lines through the fairleads at the bow and attached them to the bollard. With Cheryl at the helm and me at the bow, he payed out the hawser. We had readied the windlass and started pulling up the anchor chain with the windlass remote. Captain Mike was slowly moving the towboat forward and when Rosalind's anchor chain was almost taut, and without any prompting, he said, "Let me give you a short pull to get your anchor free." With the anchor free, it took but a minute to get the remaining 18 ft (5.5 m) of chain on board. With the anchor on the bow roller, the only thing left to do was to move the bridle over the anchor so that when the towboat pulled us, the anchor would not be forced up on the roller and hit the boat.

With the bridle sorted and the hawser taut, I went aft and took the helm. The towboat headed west and we followed, picking up speed to 6 knots (11 km/h).


Rosalind being pulled along in Herring Bay

In less than fifteen minutes, we passed the Herring Bay Light Red 2 at the south end of Herring Bay. There is a shoal spit from the marker all the way to the northern end of Herring Bay. The depth sounder momentarily registered 5.5 feet (1.7 m) as we rounded the mark. Our depth sounder is to port and with the shoal to starboard, we had less than 6 inches (15 cm) of water under our keel. We informed the Captain and he made a slight course correction. Twenty minutes later, we were slowing down. We were just outside the breakwater at Tracy's Landing. I released the bridle from the bollard, Captain Mike flaked the hawser in the towboat and came alongside Rosalind. We were securing the towboat on Rosalind's aft starboard quarter when a 50 ft (15 m) powerboat came off a plane within a boat length from us. Its wake caused Rosalind and the towboat to bang together violently. Luckily, the fenders did their job and neither boat or our suspended dinghy got damaged. The Captain aptly said, "Some people just think about themselves..." We got Rosalind and the towboat tied together and we started moving forward. I turned the wheel to starboard and the Captain picked up the slack on the forward line holding both boats together. Doing barely 3 knots (5.5 km/h), we passed the breakwater and entered the channel. A 40 ft (12 m) fiberglass sloop was a little over 50 ft (15 m) in front of us. Going over the entrance, the depth sounder registered 5.5 then 5.3 then 5.1 ft (1.7 then 1.6 then 1.55 m). No much to do other than push on. The depth sounder dropped to 4.9 ft (1.5 m).  We barely had an inch (2.5 cm) of water under our keel! Then, we were over the sandbar and in deeper water. I called the marina and informed them of our location.

Rosalind entering Tracy's Landing

The marina was going to send a dockhand to help us get Rosalind in her slip. I shared the slip location information with Captain Mike and a couple of minutes later we were slowing down and turning to port into the fairway between docks G and H. Cheryl had prepared and positioned our docking lines and Captain Mike eased us into slip H8. Rosalind rested in the middle of the slip, without having touched the dock or any of the pilings. Captain Mike is a true pro! We secured Rosalind in her slip and went to grab a lunch.


Rosalind gently placed in slip

The next day, we went on board and took care of the fuel system. We drained fuel from both tanks and confirmed that there was no more water in either tank. We also made sure no water had entered the engine through the engine exhaust system from the waves slamming our stern when we were at anchor. Everything was fine. We started the engine and let her run for 40 minutes. Rosalind was now ready to be hauled.

Thank you for following along,
Alex and Cheryl


Tuesday, August 15, 2017

Adventures on the Chesapeake - Part One

On Sunday, August 13 we left Galesville and started heading South. The day trip was supposed to be a short 4-hour motorsail between Pirates Cove on the West River and Herrington Harbour North Marina in Herring Bay. The plan was to haul Rosalind, do some work minor work on the rudder, install the satellite communication antenna on the mizzen mast, and paint the bottom before continuing South.

The weather forecast called for 5 to 10 knots of wind from the North. We left our mooring at Hartge Yacht Harbor at 8 am and by 8:20 we had the jib out and were motorsailing out of the West River doing 4.8 knots. We cleared the Green Can 1 and headed east to avoid the shoal on the south side of the river entrance extending out one and a half miles (2.5 km) to the north, northeast past Curtis Point. The wind picked up to 12 to 14 knots when we got in the Bay and the two-foot (60 cm) short waves gave Rosalind a rocking but pleasant motion. A little over half an hour later we pointed Rosalind south and headed towards Herring Bay. The apparent wind dropped and we decided to put up some more sail in order to take advantage of the following wind. Cheryl uncovered the mizzen and then took over at the helm and I went to the stern deck to raise the mizzen. I had just finished raising the mizzen when, from the direction of the cockpit, a buzzing sound told me something was amiss. Cheryl called out from the helm, "The Racor Water Alarm just came on!" I got to the cockpit, throttled back Lucy, our trusted Beta 30 diesel engine, and pulled the engine stop lever. We were heading south with a northerly wind and 20 feet (6 m) of water under our keel. Cheryl stayed at the helm and I went down the main cabin, removed the companionway stairs, got a flashlight, and opened the engine room access hatch. The Racor bowl was half full with water.  The alarms panel had earned its keep again!

Racor Alarm Lit-up (Red Light in Lower Left)

We had 10 nautical miles (18.5 km) before we had to turn north before entering Herrington Harbour North. First things first:  Get the water out and start up Lucy again.  In order to drain the Racor fuel water separator, I had to crack the T-handle at the top of the filter enclosure in order to break the vacuum. I drained about a cup of water from the Racor and retightened the T-handle. The alarm light turned off. Just to be sure that all the water was out, I went to aft cabin and got a piece of spare hose, got the five gallon (20 liter) empty diesel gerry can from the starboard lazarette, and using the diesel hand primer bulb (which I installed when we replaced the engine last year), I connected the hose to the bottom of the Racor, and got about a gallon (4 liters) of diesel out of the starboard tank.

It was time to start the engine again. Lucy fired up and after less than a minute, Lucy stalled! What happened? After removing the water, I neglected to refill the Racor with diesel. (Diesel engines do not like air in the fuel. Air locks up the high pressure pump, no fuel can get though, and the engine stalls). Nine miles (16.5 km) to go to the south end of Herring Bay...

We sailed south southwest for an hour and we were in some calmer waters. With the sails still pulling us along, Cheryl stood on the port side of the cockpit and navigated and steered Rosalind. I opened the engine room, got in the main cabin and removed the air from (bled) the engine. I had to do this twice to get all the air out of the Racor, fuel lines, lift pump, fuel filter, and high pressure pump. Lucy started right up and ran smoothly. Ten minutes later, the Racor alarm buzzed again! We shut her down and keep sailing. I went below and looked at the Racor bowl. The red-colored diesel should have been clear but it was not. Its cloudiness was an indication that there was some water still present.

We decided to sail to the south end of Herring Bay, still 6 nautical miles (11 km) away, and then anchor. After a couple of hours, we furled the jib, Cheryl turned Rosalind into the wind, and I dropped anchor. It was clear that it would take some time for the water to separate from the diesel and settle down to the bottom go the Racor. We now had two choices:  We could launch our dinghy and with our three horsepower outboard engine push Rosalind for the last five miles (9 km), or get a tow. We have used our dinghy as a push tug in the past and this can work well. The only two limitations are that you have limited maneuverability (because you have limited horsepower) and its best done in calm waters.

The entrance to Herrington Harbour North is at the top of a narrow channel. The four mile (7.5 km) channel is too narrow to tack in and the wind was on the nose. Once you get to the entrance, you must navigate between markers over a sandbar. There is a shoal in the middle of the creek and the marina fairways are very narrow. Additionally, when the weather is fine, the entrance can be very crowded with boats leaving and returning to the marina simultaneously. After a short discussion, we opted for the tow. We made the call. While waiting, I opened the starboard fuel tank deck fill and Voila, the o-ring that was supposed to act as a seal to prevent water from entering the tank had split and there was a clearly visible 1/2 inch (12 mm) gap.

Failed O-Ring from Diesel Filler Cap

Starboard Diesel Filler Station Taped to Prevent Further Water Intrusion.

Captain Mike, running the towboat, called us on the cellphone and we shared our coordinates. He was 1.9 miles (3.5 km) away...

Wednesday, August 9, 2017

Replacing the old Perkins 4-108 Diesel Engine

The Perkins 4-108 diesel engine that was on Rosalind when we purchased her was a 1984 vintage engine that was in serious need of a rebuild or replacement. While the engine ran well, the engine mounts needed to be replaced and there were indications of corrosion on the high pressure fuel lines. One fuel line had started leaking and we replaced it shortly after we got Rosalind. Additionally, we replaced the Racor fuel-water separator and sorted out the fuel system. The engine ran well, started easily enough and it did not burn oil, but we knew that spare parts were getting hard to find and we also knew that water had found its way in the fuel system, possibly corroding the very expensive high pressure diesel fuel pump.

So after estimating that it would cost just about as much to rebuild/refurbish as to get a new engine, we opted for the new engine. The first question was determining what engines would fit in the engine room and how large of an engine we really needed. Looking at the numbers, we quickly realized that the engine size was really driven by the size of the propeller aperture in the hull. The propeller aperture dictates the largest propeller that can be used on the boat and the propeller size specifies the maximum horsepower that can be delivered in the water from the engine. So, we measured the aperture, calculated the maximum propeller size, determined the type of propeller (three bladed with large surface area), and identified the maximum horsepower. We then started looking at gearboxes and engine horsepower curves and identified the Beta 30 hP engine as a good match for our needs.

The Perkins was rated at 42 hP but we were going for 30 hP, were we concerned? Looking at the engine-gearbox-propeller combination, we found out that we could not effectively use anything much more than about 28 hP, as the propeller would start caveating and loose thrust efficiency. So while we "had" 42 hP, we never used them all, so we opted for an engine that was better matched to the hull length and hull propeller aperture and went with the 30 hP.

We chose the Beta 30. There was another major advantage to the 30 hP engine. By going from a four cylinder to a three cylinder engine, we were able to move the engine-gearbox forward in the engine room. After (very) careful measurements, we were able to place the engine so that the transmission (gearbox) could be removed for service without having to disconnect the engine. This is a major benefit as gearboxes can fail more frequently than engines. On our previous boat, we did not have that option and both times we had the gearbox rebuilt, we had to remove the entire engine in order to remove the gearbox. Additionally, the new engine-gearbox location enabled the shaft coupling to move forward in the engine room and this makes it accessible for precise engine alignments.

Sea trials confirmed that we indeed had plenty of power and that any larger engine would have only added weight and limited access in the engine room.

The engine replacement process was complex and multifaceted. We had to work in 3D and locate the engine in the engine room with tolerances of only thousandths of an inch (hundredths of a millimeter). The main steps involved with the engine replacement were the following:

1. Document the old Perkins engine installation, including labeling of wiring and hoses.
2. Place order for new engine with custom engine feet matching the dimensions of old engine.
3. Disconnect old engine.
4. Suspend and relocate old engine in order to remove old gearbox.
5. Disconnect gearbox from old engine.
6. Hire crane to remove old engine.
7. Refurbish engine room (including replacing all 40-year-old through hulls and hoses).
8. Replace cutlass bearing.
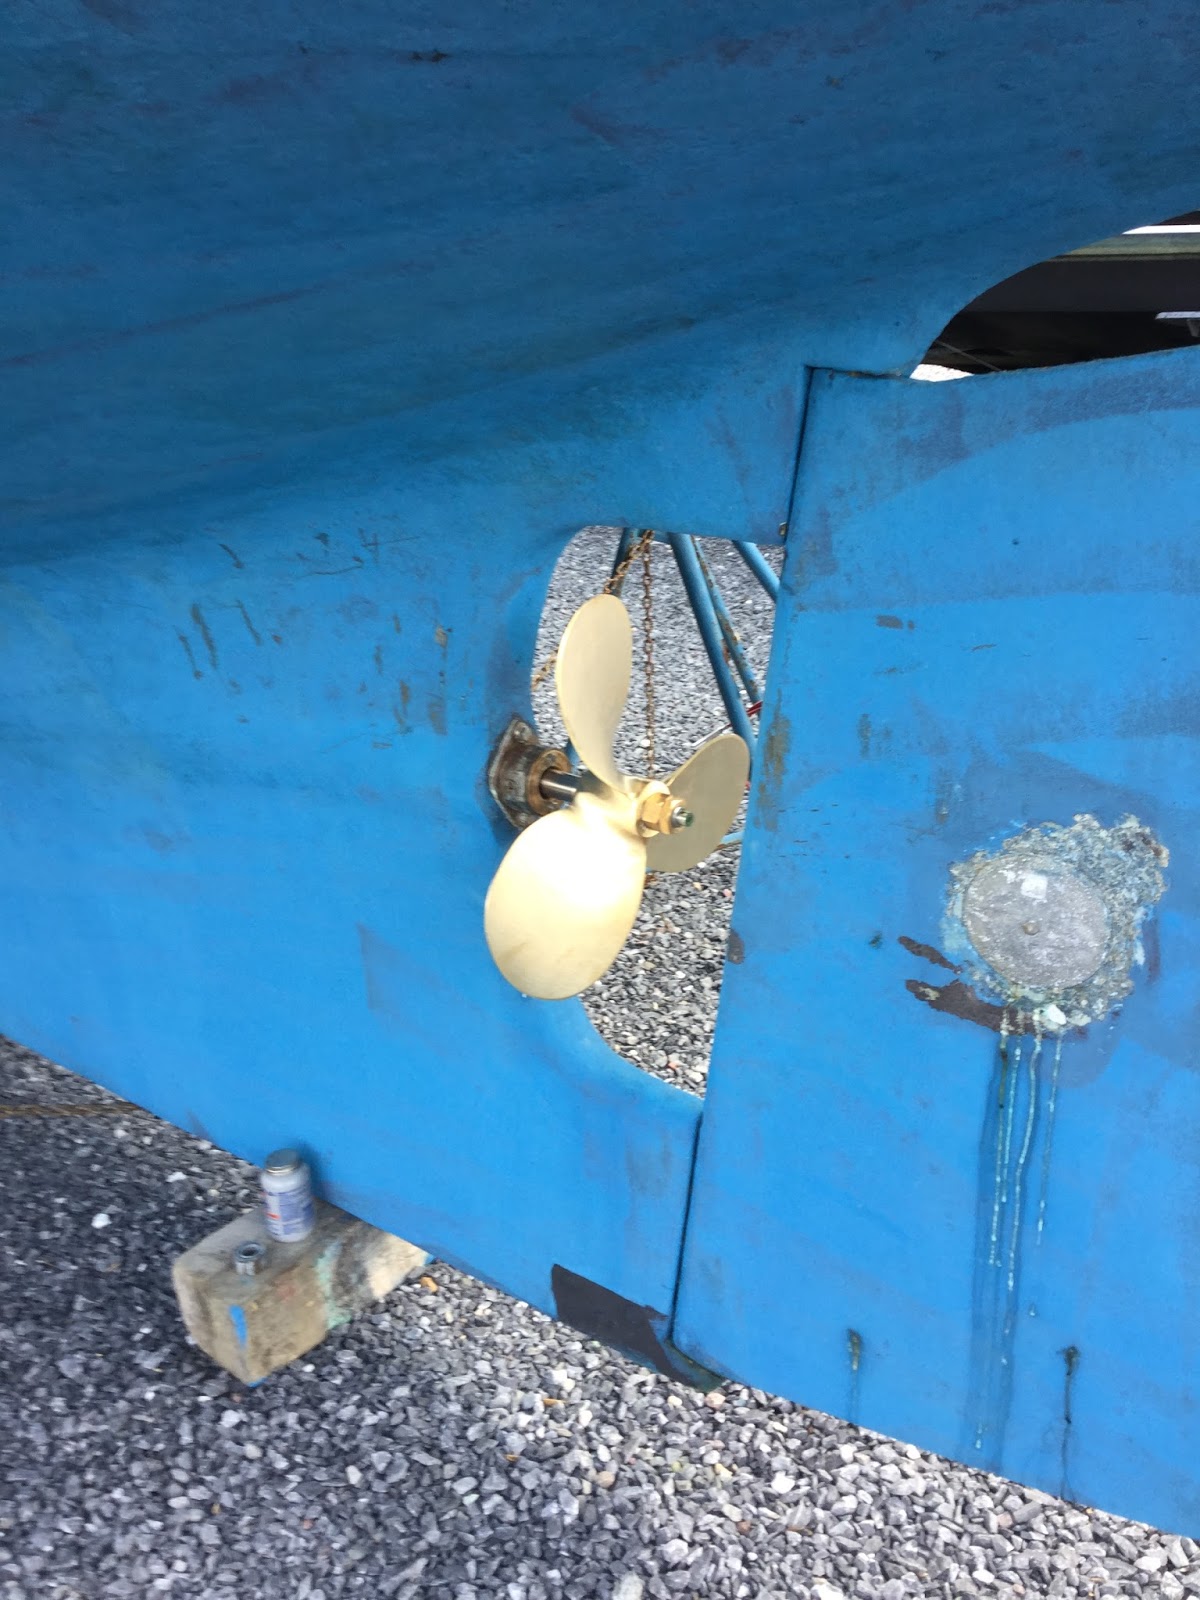
9. Measure, order, and install new shaft and propeller.
10. Hire crane to install new engine.
11. Install instruments panel for new engine.
12. Customize engine exhaust riser (welding stainless steel done by welder)
13. Connect engine exhaust, fuel, water, remote oil filter and electrics.
14. Align engine.
15. Commission engine and conduct sea trials.

The replacement of the old cutlass bearing was challenging as we had no information as to how to disassemble the old bronze fixture. The other big challenge was the engine alignment. What we found after having the new engine placed in the engine room was that the old engine was improperly placed in the engine room (with respect to the shaft) and therefore the custom engine mounts of the new engine were off by 3/4 of an inch (1.8 cm).  In order to remedy this problem, we reworked the engine stringers and ended up with the engine in the correct location. When all was said and done, this took the better part of six to seven weeks to resolve.

After some initial sea trials last fall, we sorted out some engine mount and exhaust issues that we wrote about last fall. We are very pleased with the new engine and already have put 90 hours on it. Here are some pictures of the engine removal and installation process. We hope you enjoy.

Alex and Cheryl

Old Perkins 4-108 Engine

 Old Engine Suspended in Order to Remove Old Gearbox
(necessary in order to be able to remove the engine through the hatch opening)

 Engine Disconnected, Gearbox Removed, and Cockpit Padded Prior to Engine Removal

 Old Engine (without gearbox) Hoisted by Crane

Rusted Old Engine Mounts 
(Mounts had failed and were no longer providing proper engine support)

 Engine Room After Removal of Old Engine (yuck!)

 Removal of Old Propeller and Shaft

 Disassembly of Cutlass Bearing Holder

 New Propeller, Cutlass Bearing, and Shaft Installed

Working on Adjusting/Lowering the Engine Stringers - Note Void next to Blue Tape 

Port Stringer Re-fiberglassed


 Refurbished Engine Room with Relocated Stringers and New Engine Mounts

Preparing for the Installation of the New Instruments Panel

New Instruments Panel Installed - Cockpit Port Side


New Beta 30 Engine Installed!

Tuesday, August 1, 2017

The New Alarms Panel - It works!!!

When we re-engined, we repurposed the old engine instrument panel to house various gages, switches and alarms to create an Alarms Panel. 

Old Engine Instruments Panel - Instruments removed

New Alarms Panel

The new Alarms Panel houses the Racor Vacuum gage, in the upper left, to let us know when the diesel filter is clogging up and the Racor water sensor alarm, in the lower left to let us know if water finds its way into the diesel. A clogged filter and/or water in the diesel will stall the engine, and water in the diesel will also cause damage to the engine. The panel also houses the anchor windlass Up/Down switch, in the upper part of the panel, and an digital ammeter, in the upper right, to let us know how hard the windlass is working. This is important as we do not want to burn out our new windlass motor and have to raise the anchor and chain by hand! Lastly, the panel lets us know if there is any water in the aft or engine room bilge. If there is water in one of the bilges, an alarm will sound and an LED light will let us know which bilge has the water. By depressing the switch (the switches have built in LED lights) we can silence the alarm; however, the LED will remain lit as long as the bilge pump is dewatering. In the middle of the panel there is an insulated cup holder (it fit perfectly in the old tachometer hole!). We use it to store pens, a grease pencil (handy on waterproof charts), and magic markers.  

On Rosalind, we have the option to divert the cockpit drains overboard or into the aft bilge. In the event the cockpit fills with water, the boat will sit lower on the water due to the extra water weight and this could potentially submerge the drains. If that is the case, the cockpit will not drain and water could start filling the boat! As a precaution/remedy, we can divert the water to the aft bilge and safely remove it with various pumps.

Over the winter I rewired the aft bilge pump, connected it to our Alarms Panel, and installed a new float switch to replace the old one. We now have a selector switch in the aft cabin to let us turn on the pump manually or connect it to the new float switch which automatically activates the pump when there is any water in the aft bilge. 

Aft Cabin, Looking Aft - Bilge Pump Auto/Manual Selector Switch (in black) Located on Starboard Side above Yellow Life Raft

During spring commissioning, before we moved onboard, we got a call from the Harbormaster at Hartge Yacht Harbor where Rosalind is moored. Our bilge alarm for the aft bilge was buzzing. The Harbormaster heard the alarm from shore and used his launch to inspect Rosalind  All was well. There was no water finding its way onboard, but there was just a little water in the bilge. We immediately drove to the marina and got onboard to figure out what happened. We found that we had left the cockpit drain valves to the bilge position. We had also removed the sides of the cockpit enclosure and as a result, some water got in the cockpit from a strong thunderstorm that passed through Galesville.  The pump worked, the alarm system worked, and even the new float switch worked perfectly. I had just installed the new float switch 1/2 inch (1 cm) too low, and the pump could not get the last bit of water out of the bilge! It took but a minute to re-adjust the pump switch elevation. 

I have always wanted to install an alarms panel and I am very happy that we have one on Rosalind.  When putting it all together, a year ago, I remember testing the buzzer at home and thinking, "Boy, this is loud!" That loudness sure came in handy!  It took eight coats of varnish and lots of work to wire it all but in the end it was all well worth it!

Thanks for visiting,
Alex and Cheryl

Sunday, July 23, 2017

Short Videos From Chesapeake Bay Cruise Part 2


Sailing to Solomons Island


Anchoring Just in Time - Solomons Island, Maryland


Sailing to Galesville, Maryland

Friday, July 21, 2017

Chesapeake Bay Cruise - Part 2


For the second part of the cruise, we decided to head south on the Bay. From the West River, going south there are only three options for the first leg of the trip. You can go all the way to The Solomons, go into the Choptank River through Knapps Narrows and anchor at Dunns Cove, or head to the Little Choptank River. A straight run to The Solomons would take over 9 hours, and Knapps Narrows is a little too shallow for Rosalind. We got fuel and water in the morning and did not get underway until 10 am. We did not want to get at the Solomons at 7 pm, giving ourselves only an hour or so of margin for head winds and currents to arrive before sunset, so we chose the third option, the Little Choptank River. There were a number of power and sailing boats in the West River and on the Bay near Thomas Point Light, but soon after passing the Bloody Point Light we started seeing fewer and fewer boats. The Little Choptank River is a favored destination for sailboats heading north or south on the Bay between the Patuxent River and Eastern Bay or the West River. The entrance is well marked but there are shoals extending well out into the Bay. We entered the river and soon could see a number of masts behind the low land terminating at Casson Point. We got in Hudson Creek and found a spot to drop the anchor. Last time we were there, over six years ago, it was late in the season and we had been all alone. This time, we shared the creek with half a dozen sailboats. We put up our anchor riding sail and after dinner turned in for the night.

The next morning we were up with the sun and headed to The Solomons. We motored out the river, motorsailed for a short distance then enjoyed a very pleasant sail for 2 1/2 hours. We then motorsailed the rest of the way to Solomons Island. We motored up Mill Creek and dropped anchor at the entrance of Spring Cove. We had not been at The Solomons by boat for 13 years and were looking forward to revisiting some of the old familiar places as well as seeing what had changed since our last cruise.


 Sunset, Mill Creek, Solomons Island, Maryland 

We enjoyed Solomons Island and the surrounding area for the better part of week. One day, we walked to Annemarie Sculpture Gardens, associated with the Smithsonian. It was a great adventure, the 5 mile (8 km) round trip walk was pleasant, albeit hot, but the gardens were well worth it! We met some old friends at Zahnizers Marina and met a fellow sailor who lives at Spring Cove.


Sunset, Mill Creek, Solomons Island, Maryland 
While we were at Sping Cove, we got buzzed by an F16 fighter jet out of Pax River. The plane flew right over us, very low, and with the afterburner on it was unbelievably loud. We were down below and heard the roar. The intensity was such that one had difficulty thinking and everything was humming or resonating. We got to the cockpit just in time to see the plane passing over Rosalind. I would not be surprised if the plane was under 1000 ft (300 m) high. I do not think the buzzing was intentional, as planes do touch and go maneuvers at Pax River Naval Air Station all the time, but for the duration of our stay, all other planes stayed to the east of us! One morning our outboard refused to start. I took it apart and it was clear that we needed some carburetor cleaner as the low speed jet had gummed up. We managed to get it started and after taking the necessary tools with us, we headed to shore. We got carburetor cleaner then, after enjoying the day on shore, took the outboard apart at the dinghy dock, cleaned it, reassembled it and presto we were back in business. As the saying goes, "Cruising is doing boat maintenance in exotic places"!!!


We watched the weather and with southwesterly winds we headed back north towards Galesville. We enjoyed a great sail in 15 to 23 knots of wind and spent the night in the Little Choptank River, this time in the company of only a couple of sailboats. The next day we sailed back to Galesville, in similar weather, where we picked up our mooring.

 View of the West River, Galesville, Maryland

The mid-Bay cruise took 19 days. We were on the hook (at anchor) for the duration and had some nice sailing weather ranging from very light airs to moderate breezes. We met old friends and made new ones while visiting some familiar places.


Thanks for joining us,


Alex and Cheryl

Wednesday, July 19, 2017

Chesapeake Bay Cruise - Part 1

We had been onboard for a few weeks putting the final touches on the Rosalind and we were now looking for a good weather window to start our cruise around the middle part of the Chesapeake. So after we topped off the diesel tank and provisioned, we left our mooring in Galesville and motorsailed to Saint Michaels on Maryland's Eastern Shore.

Saint Michaels can be very touristy in the summer but early and late in the season it's a real gem. We spent a couple of very pleasant days walking around town and enjoying the anchorage almost all to ourselves.  We were looking at the weather and we knew that a heat wave was on the way. So, we chose to move on and take advantage of a nice breeze from the southwest before the heat reached us.  Our new destination was the South River.  Even though we had spent over 15 years a stone's throw away, we had never been there.

We had a very nice sail out of the Miles River and with the wind on the nose (dead ahead) we motored out of the Eastern Bay. We were able to enjoy a nice sail across the Chesapeake in light airs and the breeze picked up as we got closer to the South River. On a dead run (with the wind from astern) we decided to reduce sail to gain more control before entering the South River. Our destination was Harness Creek a couple of miles upriver. Despite reviewing the cruising guide and consulting the chart, the entrance to the creek was not clear to us. Where we were expecting to find one private marker, we found three. We knew that there were shoals on both sides of the entrance. The wind was from astern and as we did not want to end being pushed up on a shoal, we decided not to enter Harness Creek and moved on to Aberdeen Creek, the next creek upriver.

Aberdeen Creek is a snug little creek that can hold less than a handful of boats at anchor. The creek narrows pretty quickly so one has to anchor soon after entering. We dropped anchor in 13 ft (4 m) of water, in a muddy bottom, and initially shared the anchorage with a 40 ft (12 m) sailboat.  The western shore of the creek is lined with large homes with deep water docks. On the eastern shore, there is a large estate with a pool house and swimming pool near the water and a large mansion hidden behind old growth trees further up the hill. Even though it was clear we were close to civilization, the setting was very tranquil.

The next day, a twenty-minute dingy ride from Aberdeen Creek brought us to the dinghy landing of the Quite Waters Park, and a two mile (3 km) walk through the wooded park got us to Annapolis. This was a new and fun way to get to this great maritime city. We knew that storms were on the way and made sure to be back onboard well before they reached the anchorage.

It was hot, and the ambient temperature reached 96 degrees (36 C) in the shade. Cold drinks and cold showers on deck kept us cool until a violent thunderstorm at sunset dropped the temperature by 30F (17 C).  The storm also brought 30 knot winds and hail. Luckily there was no damage. Before the storm we put all of our electronics in the oven. The oven, acting as a Faraday cage, protects the electronics from electromagnetic pulses during storms. As the wind started to pick up, and due to Aberdeen Creek being rather small, we started the engine and took the strain off the anchor.

We enjoyed the creek and Annapolis and a few days later we headed back to Galesville, now as cruisers and no longer mooring holders. The trip was short, less that three hours, but it was foggy and rainy. The enclosed cockpit, radar, and windshield wipers all proved their worth and we had a pleasant short trip. We anchored in front of Thursday's Restaurant and even though we had been on the West River for well over a dozen years it felt different. We were now looking at it with different eyes and from a different perspective. The change was subtle but real.

We stayed in Galesville, at anchor, for almost a week enjoying the setting, doing some maintenance, and restocking Rosalind. Here are some pictures and artwork of the first part of our Chesapeake Bay cruise.

Thanks for visiting,
Alex and Cheryl


Ducks Welcoming Committee, Saint Michaels, Maryland

Words of Wisdom!, Saint Michaels, Maryland 


Colorful Home, Saint Michaels, Maryland


A Tranquil Morning, San Domingo Creek, Maryland


Sunset, Aberdeen Creek, Maryland


 A Transient Tug, Galesville, Maryland